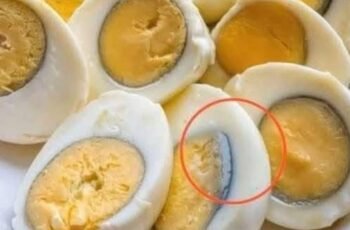
You’ve carefully prepared your hard-boiled eggs for a salad or snack, only to discover an unwelcome greenish-gray ring around the yolk when you peel them. While this phenomenon is common and harmless, it can be visually unappealing and may leave you wondering what went wrong. The good news? It’s not a sign of bad eggs or poor cooking skills—it’s simply a matter of chemistry. Here’s everything you need to know about why this happens and how to avoid it without needing culinary expertise.The Culprit: A Chemical ReactionThat infamous green ring forms due to a reaction between two components found naturally in eggs: iron from the yolk and sulfur from the white. When eggs are overcooked, these elements combine to create a thin layer of iron sulfide on the surface of the yolk. While completely safe to eat, this compound gives the yolk its undesirable greenish hue. Overcooking also intensifies the sulfur smell often associated with boiled eggs, which can detract from their overall appeal.Fortunately, preventing this issue doesn’t require advanced techniques—just a few simple adjustments to your method will ensure perfectly cooked eggs every time.The Surefire Way to Make Flawless Hard-Boiled Eggs1. Start ColdBegin by placing your eggs in a single layer at the bottom of a pot, ensuring they aren’t overcrowded. Cover them with cold water, leaving about 3–5 cm (1–2 inches) of water above the eggs. Starting with cold water helps heat distribute evenly, reducing the risk of cracking during cooking.2. Heat GraduallyBring the pot to a gentle boil over medium heat. Avoid cranking the heat up too high, as rapid boiling can cause the eggs to bump against each other and crack. Once the water reaches a boil, turn off the heat and cover the pot.3. Let Time Do Its WorkAllow the eggs to sit in the hot water for 9–12 minutes , depending on your desired level of doneness:9 minutes : Slightly soft yolks with a creamy texture.12 minutes : Firm yolks ideal for salads or deviled eggs.Timing is key here—overcooking leads directly to that pesky green ring.4. Express CoolingAs soon as the timer goes off, transfer the eggs to a bowl of ice water (or very cold water). This step stops the cooking process instantly, preventing the green ring from forming and making the shells easier to peel. Let them chill for at least 5 minutes before handling.5. Peel Without StressOnce cooled, gently tap the eggs on a hard surface to crack the shell, then peel them under running cold water. The water helps loosen the membrane beneath the shell, minimizing damage to the egg white.Bonus Tips for Perfect ResultsUse Slightly Older Eggs: Fresh eggs are notoriously difficult to peel because their inner membrane clings tightly to the shell. Opt for eggs that are 5–7 days old for easier peeling.Add Salt or Vinegar: A pinch of salt or a splash of vinegar in the cooking water can help prevent leaks if an egg cracks while boiling. These additions won’t affect the taste but will stabilize the whites.Storage Guidelines: Keep unpeeled hard-boiled eggs in the refrigerator for up to a week . If peeled, consume within 2–3 days for optimal freshness.What’s the Secret? Timing Is EverythingThe key to avoiding the green ring lies in one simple principle: don’t overcook your eggs , and cool them immediately after cooking. By following the steps outlined above, you’ll achieve beautifully golden yolks encased in smooth, tender whites—eggs that look as good as they taste.An Easy Habit to DevelopMaking perfect hard-boiled eggs doesn’t have to be complicated. With a bit of attention to timing and cooling, you can sidestep the green ring dilemma entirely. Whether you’re prepping ingredients for a recipe or whipping up a quick snack, mastering this technique ensures consistently delicious results. So next time you boil eggs, remember: start cold, time it right, and chill promptly. Your salads—and your guests—will thank you!Enjoy!

